There are certain gear essentials that I need for my food photography and I’m not talking about food styling props. These are gear essentials that make my work easier. They allow me to work in a variety of situations where I can be as efficient as possible by saving space and perhaps even some money. There is so much more in food photography than just the food itself, the food props and styling.
Camera
While we all can make a picture with our phone these days, a DSLR camera is what you (eventually) would want to make pictures with. So this is in my opinion an absolute must. Of course, a lot of people will say that you don’t need a DSLR camera to be a food photographer and that is true. But if you would like to work in different light situations, have control over the depth of field, take razor sharp photos at high resolution, and achieve that perfect bokeh effect a DSLR camera is worth the investment.
Which camera is best for food photography? The camera itself (also called the body) can either be a full frame or a cropped sensor and it depends on your budget/wishes which camera is best for you. You don’t need a full frame body (especially if you are just starting out). A ”less expensive” body with a cropped sensor can shoot beautiful photos. I have been using the Canon EOS 70D for years until I switched over to the full frame Canon EOS 5D Mark IV. Both make gorgeous photos, but the prices are quite different.
Lens
In my opinion lenses are where you should spend the majority of your budget on. You might change your camera body over time, but lenses are a long term investment.
If you are on a budget I think it’s best to save some money by buying a cropped sensor/ less expensive camera body and buy a good quality lens. A lens can really lift your food photography to the next level. In food photography there are a few lenses that are used by a good amount of professional food photographers. It will depend on your own style and budget which lens is best for you.
Most of my lenses are compact fixed lenses (fixed means that the lens can’t zoom in or out). When I shoot with a fixed lens I will have to physically move myself closer or farther away from the set to get the right shot. The good thing about fixed lenses is that they can be smaller, cheaper, faster and sometimes have a better quality than zoom lenses. Most fixed lenses have a nice wider aperture, which gives a greater control over the depth of field.
I could write an entire article about the difference in camera bodies and lenses for both a cropped and a full frame sensor, but in this article I will share what I have used before and what I’m currently using.
For the Canon EOS 70D:
- The Canon 60mm f/2.8 macro lens. I have used this lens most of the time (not just for close ups). This lens is amazing to create nice sharp photos. This is a great macro lens for a cropped sensor such as the Canon 70D camera.
- The Canon 50mm f/1.4 lens for mostly overhead shots. This lens is great for both a full frame and cropped sensor.
Currently for the Canon EOS 5D Mark IV:
- My favorite lens is the Canon 100mm macro f/2.8 macro lens. I use a macro lens for close up shots to capture details. It’s also great for 45-degree angle shots. I use my macro lens the most since I love the super clear quality it produces. This lens is wildly popular among food photographers because it’s great both backed off and as a close up. The focal length will add the blur to your backgrounds giving it that extra silky smooth bokeh effect.
- The Canon 50mm f/1.4 is a lens I truly love. Over time it has become my standard lens for food photography. The best thing about this lens is that it’s available with three completely different price tags. The three versions for Canon are the f/1.2, f/1.4 and f/1.8. I shoot with the f/1.4 version and I love it. This is the main lens that I use when shooting overhead shots.
- The Canon 24-70mm f/2.8L zoom lens is an amazing all-round lens (not a fixed lens). This lens is a beast and can do anything. From travel photography, portraits, food photography, large overhead table settings…you name it. Although, this lens comes (just like the 100mm macro lens) with a big price tag, it is worth the investment.
Light
Good light is essential for food photographers. Without good light you are (even with the most expensive equipment) empty handed on set. In food photography there are a few ways to create beautiful light such as natural outdoor light and artificial light. I love shooting with natural light and it’s completely free, well almost. Depending on your light situation, you will only need to tame and manipulate the light with a diffuser or skim. This is simple and inexpensive. When light is for example coming in through a window you can use a semi sheer white curtain over your window to soften the light. You can also cover your window with white parchment baking paper to create the same effect. Clouds are also great (free) light diffusers. You can of course also buy diffusers or skims that will evenly diffuse the light.
If you place the diffuser between your light source and the food, you’ll create a softer and less harsh light. So think of a diffuser as a way to create indirect light. It will avoid blown out highlights, uneven shadows and it takes away the harsh appearance of food. It’s important to think about this and perhaps invest in any type of diffuser since perfect light is the holy grail in food photography.
Reflector
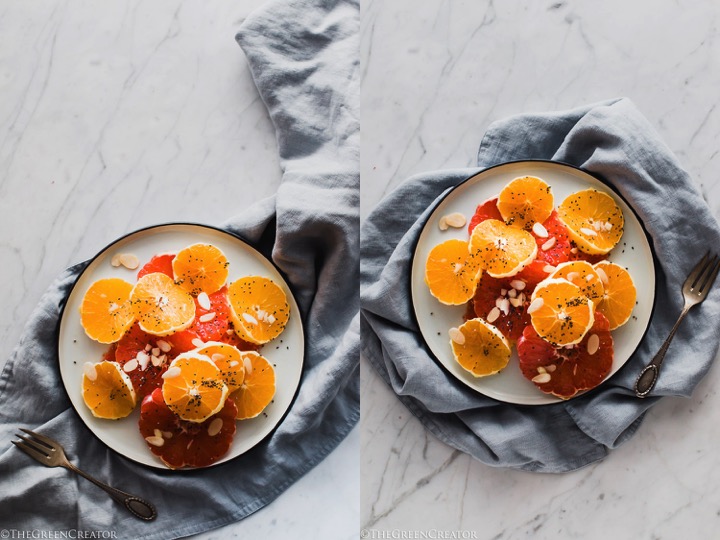
A great essential for food photography is a white or black bounce board or reflector. This will allow you to control your light source by bouncing the light back into your scene and remove any dark shadows. You can use a variety of materials for a reflector, such as a white foam board. You can buy these at any craft store and they’re super useful to have. I sometimes use a (second) diffuser to bounce the light back, but you’ll need a stand and clip to hold the reflectors in place (they don’t stand up on their own) or hold them yourself. If you want to add more shadows, you can use a black reflector/foam board to remove the light in your set-up.
Below is an example of a picture with and without the use of a white bounce board on the bottom of the photo.
Tripod
Although there are plenty of food photographers who shoot without a tripod, I think that a tripod is very important for a food photographer. I always feel a bit more limited when I shoot without a tripod.
A tripod will give you first of all more freedom to style your scene. Once you set your good angle, you can freely move and perfect your food. In food photography it’s all about great looking food.
The second reason why I love my tripod is that I can create super sharp pictures without having to adjust my shutter speed or ISO when shooting in lower light or when holding the camera (which always creates a shake that can lead to blurry images). With a tripod I’m able to shoot in gorgeous (low) indirect light situations where I can set my camera to an ISO of 100 (to avoid any noise), and set the f-stop that I need for my picture without having to worry about my shutter speed. You can set a super low shutter speed without having to worry about any blurriness in the picture. You get my point: a tripod is essential. Be sure to get a good steady tripod, especially if your camera is heavy since the cheaper ones tend to be more flimsy and you don’t want your tripod with your camera to tip over.
Remote control
Together with a tripod a great essential in my camera bag is a (wireless) shutter release remote. When shooting with a low shutter speed every possible shake should be avoided to create a sharp image. In these situations it’s important to stand still (floors can move when you move or walk away) and don’t touch the camera. Even pressing the shutter button can make the camera move. The best way to take a photo then is via a remote. This will also allow you to be more flexible in styling and shooting. A remote control is also ideal if you would like to make a photo with your hands in the set-up for example.
All in all, a remote and tripod will avoid blurriness while giving you much more flexibility to play with your scene and f-stop while keeping your ISO as low as possible without being restricted by a higher shutter speed.
Editing program
And last but not least, is the editing part in food photography. There is a lot to say about this. An editing program should enhance a great picture. Editing is an important part in food photography. An editing program such a Lightroom will allow you to make a photo pop, to create a certain consistent look (for example for Instagram) and to bring back again certain colors that got lost while shooting. You can bring out the greens in herbs or do the opposite. Lightroom can also remove splatters, crumbs and specks that you haven’t noticed while shooting. Lightroom is like magic for food photography. Unlike for example portrait photography, in food photography it’s more acceptable to (mainly color-wise) manipulate a photo.
Lightroom is also a great editing program to correct the white balance in a picture, bring down the highlights and create contrast. You can also use a preset to speed up the editing. I like to use my own created preset or the Porta Pushed preset from Mastin Labs.
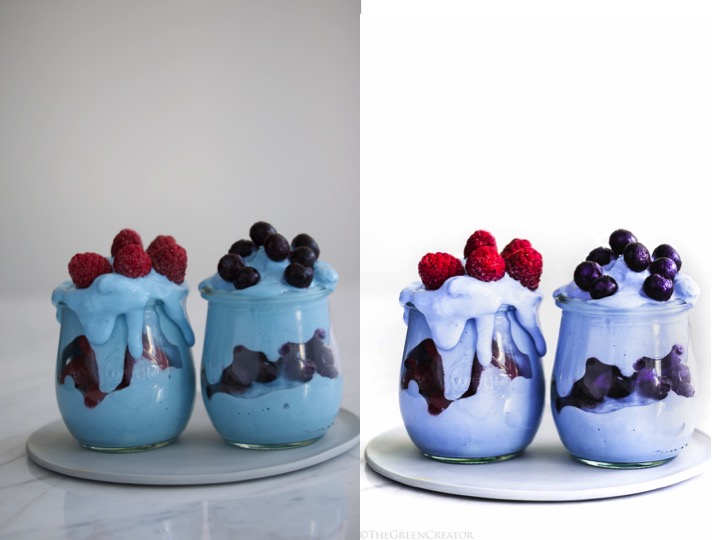
Below is an example of a photo with a blue subject and a blue tone that looked very dull to me. The light was average, the styling was how I wanted it to be, yet I couldn’t make the picture pop while shooting. After a quick edit in Lightroom I managed to create the photo that I had in mind: light and bright with a rich light blue color.